
Short answer
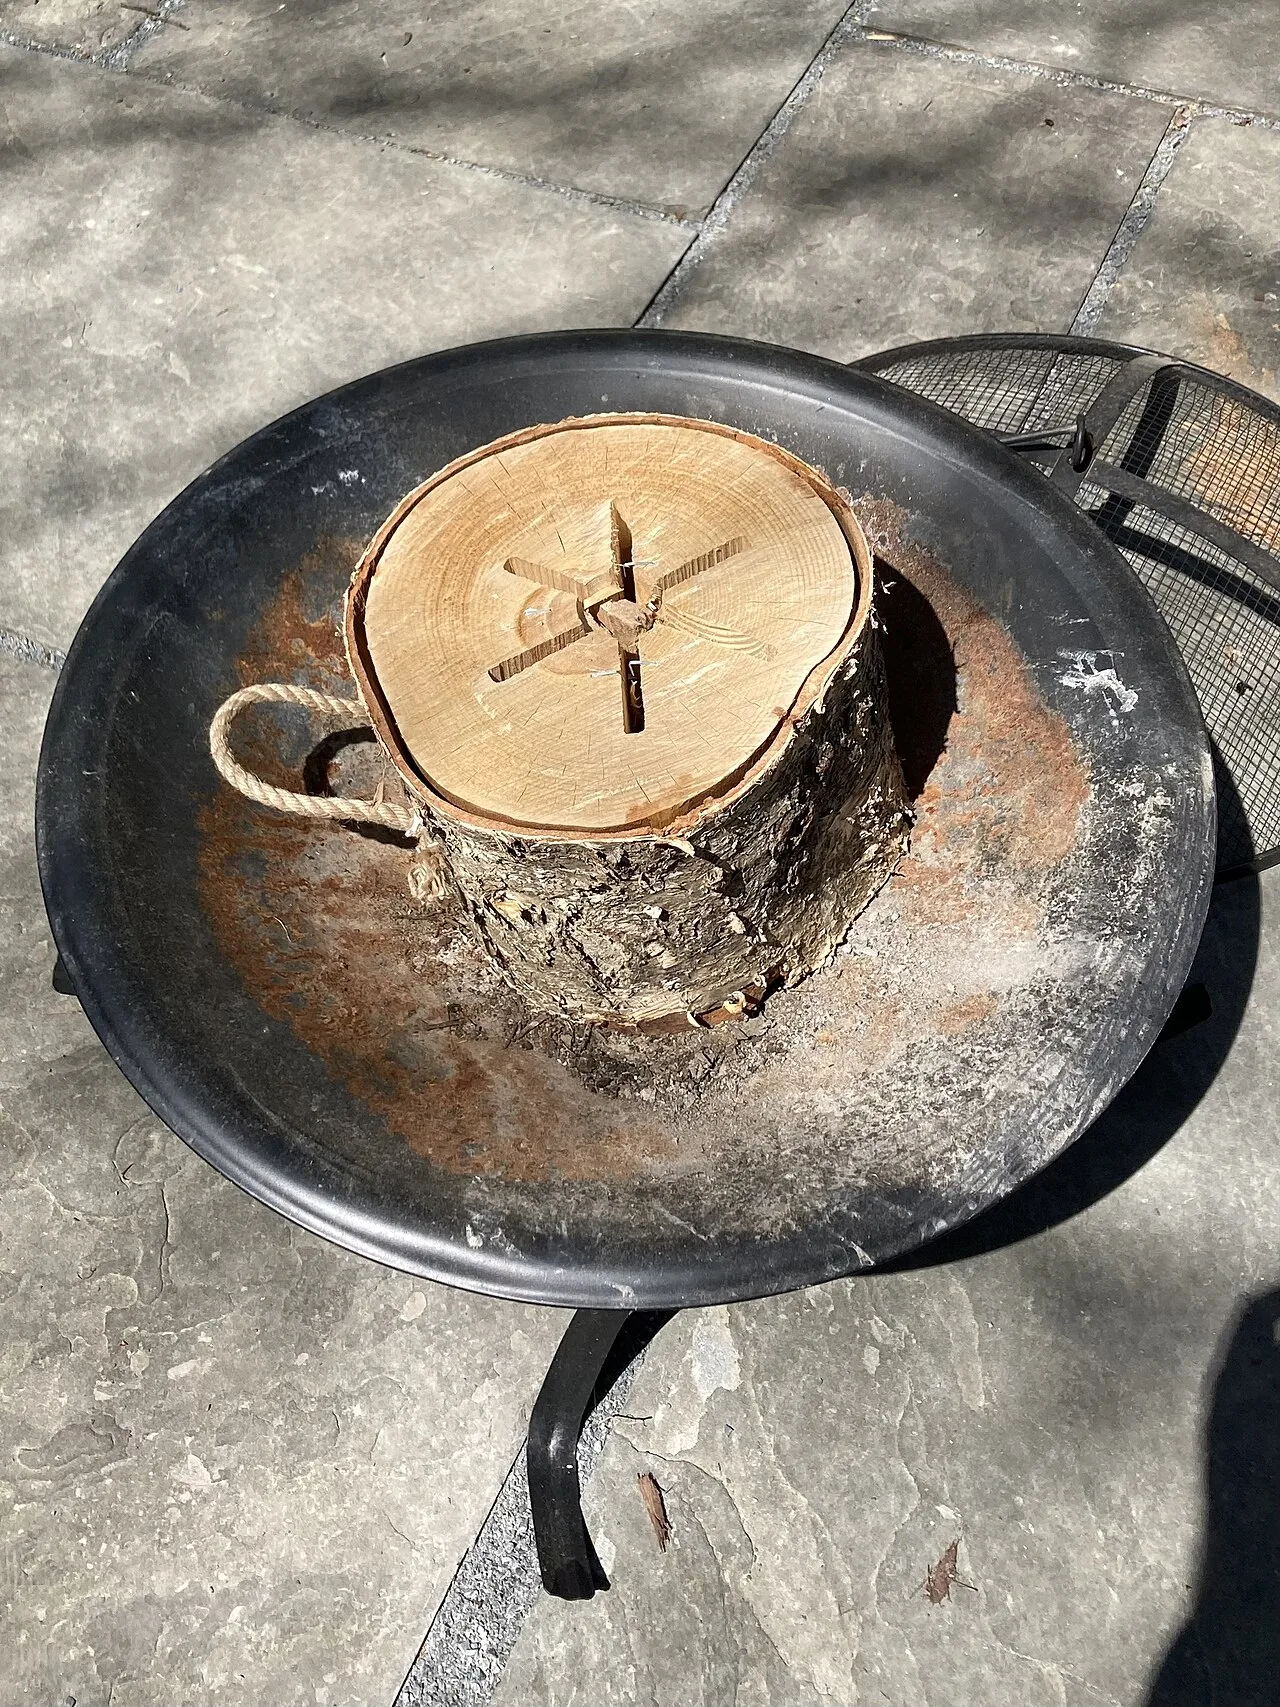
A Swedish fire torch is an upright log with crosswise cuts that stop about a hand's width from the bottom, or with a hole drilled down the middle. Light it in the middle from the top, and it burns downwards and from the inside. A log of 25–40 centimetres burns for two to five hours depending on its size and the type of wood. Stand it on a fireproof plate or gravel, never on bare rock, moss or peat, and bring the log from home.
It's dusk by the lake and the snow is ten centimetres deep. The fire pit is buried, and nobody can face shovelling. Someone lifts a log out of the boot, a piece of spruce as high as a knee, with a cross sawn into the top. It goes on a metal plate, a few pieces of birch bark are pushed down into the cross, and one match later there's a flame right in the middle of the log. A quarter of an hour later the coffee pot is sitting on top.
That's the great advantage of the Swedish fire torch. All the preparation is done at home. At the fire all you need is a match, a plate and a little patience.
What a Swedish fire torch is
A Swedish fire torch, sometimes called a Swedish candle or Finnish candle, is an upright log with lengthwise cuts that meet in the middle. The fire is lit from the top at the centre. Embers fall down into the cuts, and air is drawn in at the bottom through the gaps. The log becomes its own chimney and burns from the inside out.
That means the fire is concentrated in a small area, that it stands up to damp and snow better than an ordinary fire, and that the top becomes a flat surface to put a saucepan on. The downside is that the log has to be prepared with a saw or an axe, and that it takes a long time to put out.
The memory model: log, cuts, base
Three things decide whether the Swedish fire torch turns out well.
- The log. The right thickness, the right amount of moisture and a log you're allowed to use.
- The cuts. A cross that goes straight down and stops a hand's width from the bottom.
- The base. Fireproof ground under the log and an air gap between the top and the saucepan.
Get the log wrong and you have a smoking stick. Get the cuts wrong and it falls apart or won't burn. Get the base wrong and it burns into the ground or gets smothered under the saucepan.
The log: size, type of wood and moisture
How big should it be?
The classic descriptions talk about logs 30 to 60 centimetres in diameter and up to a good metre long. That's a torch for a whole evening. For a family who want to make coffee and heat up soup, smaller is enough. A log 25 to 40 centimetres thick and roughly knee-high, 40 to 60 centimetres, is easy to carry and stands firmly.
| Log thickness | Approximate burning time | Suited to |
|---|---|---|
| 15–20 cm | A good hour | Light and warmth, a cup of coffee |
| 25–30 cm | Two to three hours | Coffee and a saucepan of soup |
| 35–40 cm | Three to five hours | A whole evening, several rounds of food |
The times are approximate. Softwood burns faster than hardwood, a dry log faster than a damp one, and a log in the wind faster than one out of the wind.
Which type of wood?
- Spruce and pine light easily and burn with a tall flame. Spruce crackles and throws out sparks, so it needs more clear space around it.
- Birch and other hardwoods are harder work to saw but burn more calmly and for longer, and give good embers.
- Never treated, painted or glued timber. Old fence posts and pressure-treated studs don't belong in a fire: Livsmedelsverket (the Swedish Food Agency) explicitly advises against treated timber for barbecuing, and Kemikalieinspektionen (the Swedish Chemicals Agency) says the poison in treated timber isn't destroyed by ordinary burning. Timber like that goes to the recycling centre.
The right amount of moisture
The log shouldn't be green, but it shouldn't be bone-dry either. A freshly felled log is hard to get going and smokes a lot. A log that has been lying dry for several years can burn out in an hour. Best is wood that has dried for a season, with cracks in the ends, and that sounds clear when you knock on it.
Where the log comes from
Allemansrätten, the Swedish right of public access, is clear on this. Naturvårdsverket (the Swedish Environmental Protection Agency) says you may not chop or saw down trees or bushes, and that fallen trees belong to the landowner and may not be used as firewood. MCF (the Swedish Civil Defence Agency) adds that this applies to both living and dead trees.
That means the Swedish fire torch is prepared at home. Take a log from your own garden, buy a ready-made one from a firewood dealer or ask a landowner who's clearing anyway. That's no disadvantage: the cuts are sawn far more safely in a woodyard than at a fire pit.
The cuts: sawing or splitting
With a chainsaw
The quickest way. Stand the log upright on level ground, ideally wedged so it can't tip over. Draw a cross on the top in chalk, or a star with six or eight points if the log is thick.
- Saw straight down along the lines.
- Stop about a hand's width from the bottom, around ten centimetres. The unsawn foot holds the log together while it burns.
- One cross is enough for a log up to 30 centimetres. Thicker logs do well with three or four cuts.
The chainsaw is the most dangerous part of the whole project. The most important thing to know about is kickback. If the upper part of the bar tip touches the wood, the chain can throw the saw backwards and upwards towards your face in an instant.
- Chainsaw trousers and boots with saw protection, gloves, a helmet with visor and ear defenders. Every time, even for a single log.
- A working chain brake. Don't use a saw where it's broken.
- Both hands on the handles with your thumbs wrapped round, and your left thumb under the front handle.
- Nobody within three to five metres, and children and dogs well away. Preferably don't work alone.
- Stop well before the bottom. The chain must never reach the ground, a stone or the plate under the log.
- Do a chainsaw course if you haven't already. It's the best protection there is.
With a drill
There's also a version without cuts. A large hole is drilled straight down the middle of the log, and a smaller hole is drilled at an angle from the side near the bottom so that it meets the middle hole and lets in air. The fire then burns in the hole like in a stove, and the log holds together for a long time. It takes a long, thick wood drill bit and a powerful drill, and it takes time to get the holes straight. The burning itself, the support for the saucepan and putting it out work the same as for the sawn torch.
With a hand saw
It's possible, but sawing lengthwise through an upright log takes time. A bow saw with a coarse blade works better than a handsaw. Lay the log down and clamp it, or saw just one cut and split the rest with an axe. For most families the splitting method below is easier.
Splitting with an axe
The split Swedish fire torch needs no saw at all, and this version can be made with an ordinary splitting axe.
- Split the log into four to six pieces in the woodyard.
- Carve away a bit of the heartwood on each piece with the axe or knife, so that a narrow channel forms in the middle when the pieces are put back together.
- Put the pieces back together and leave narrow gaps between them for air.
- Tie the log together with wire at two heights. Rope burns through, and then the whole torch falls apart.
The split torch often burns faster than the sawn one, because the gaps are wider. It's also more likely to fall apart towards the end, so the wire isn't optional.
Lighting from the top
A Swedish fire torch is lit from the top, not the bottom. The fire should take hold in the middle and then eat its way downwards.
- Stuff tinder into the middle. Birch bark, resinous fatwood, wood shavings or a firelighter are pushed down where the cuts meet. A little in the gaps at the top too.
- Put shavings or thin sticks on top, like a small fire on the top.
- Light it and be patient. For the first few minutes it burns mostly on top. After a while the air starts drawing through and the flame begins to come up out of the middle.
- Blow gently into the cuts if it hesitates.
How to build the tinder and get a fire going in wet weather is covered in the guide to lighting a fire. If you already have a fire going, a few scoops of embers from it can go on top. That often lights the log faster than matches.
Allow a quarter of an hour to half an hour before the torch is burning steadily enough to cook on. Never use petrol or meths to speed it up. MCF warns against pouring flammable liquid directly onto embers and mentions petrol and meths in particular, and the flame can flare up towards whoever is holding the bottle.
Cooking on top
When the flame stands steady in the middle and the top has started to flatten and glow, it's time.
Give the fire air
The most common mistake is to put the saucepan straight on the top. That blocks the chimney, the fire gets smothered and it starts to smoke. Instead, lay two thin, split sticks in parallel across the top, or put three small stones around the middle, and stand the pot on them. A gap of a couple of centimetres is enough. Stones should be dry and not taken from a lake or stream, because damp stones can crack in the heat.
Some people knock three nails in around the middle before the log is lit. It works, but the nails end up in the ash afterwards and have to be picked up.
What works
The heat is concentrated in the middle and fairly strong. It works for:
- Boiling water for tea, hot chocolate or kokkaffe (boiled coffee). It's quick.
- Heating soup and stews that have been cooked at home, such as ärtsoppa over an open fire.
- Frying in a small pan, such as eggs, pork, sausage or frying-pan bread.
The middle of the pan gets much hotter than the edge. Move the food outwards once it has browned, much as on a griddle pan. More about heat zones and fat is in the guide to griddle and frying pan over a fire.
What doesn't work
- Heavy cast-iron pots. The log rarely burns completely evenly, and towards the end it can lean or sink on one side. A light saucepan or a small pan is safer. The heavy pot stands better on a bed of embers, see the guide to cast-iron pot over a fire.
- Large frying pans. They cover the whole top and make it hard for the fire to breathe.
- Raw chicken and mince can be fried, but because the heat is uneven it's easy for the outside to be done before the inside is. Livsmedelsverket says chicken and mince must be cooked through and that mince must reach 70 degrees. Flatten the burgers, turn them often and ideally use a thermometer.
Hold the handle with an oven glove. The flame of a Swedish fire torch often licks up around the edge of the saucepan.
When something goes wrong
| What happens | Why | How to rescue it |
|---|---|---|
| It smokes but won't burn | Damp log or too little tinder | More birch bark and shavings in the middle, blow into the cuts. Put embers from another fire on top |
| The fire creeps out to the side instead of burning in the middle | One cut is wider than the others, or the wind is pushing on it | Turn the log so the wide gap is out of the wind |
| It goes out under the saucepan | No air gap | Lift the pot and put sticks or stones underneath |
| The top burns down quickly and unevenly | Dry log, wind, or a split torch with wide gaps | Cook the food early, and make a thicker log next time |
| The log is leaning | The foot has started to burn, or the ground is sinking | Take the saucepan off immediately. Let it burn out or put it out |
| The pieces are falling apart | The cuts went too far down, or the wire was missing | Push the remains together with the spade into an ordinary fire in the fireplace |
Safety: the ground, sparks and putting it out
Where it can stand
A Swedish fire torch is still an open fire. Only light a fire where it's allowed, and check whether there's a fire ban. What applies is covered in fire in nature, rules and responsibility.
- Permanent fire pit, gravel or sand. That's where the torch belongs.
- A fireproof plate on snow, ice or uncertain ground. The log gets hot right down to the foot towards the end, and on snow it melts itself crooked.
- Never on bare rock or large boulders. Both Naturvårdsverket and MCF advise against it, because the rock can crack and be permanently damaged.
- Never on moss, peatland or earthy forest ground. There embers can work their way down into the ground and smoulder for a long time before flaring up.
- Not under branches. The flame rises high out of the middle, often higher than an ordinary campfire.
- Not on decking, jetties or benches, and not near tents or lean-to shelters.
Sparks and falling
The log can lean and fall apart once it has burnt for a while. Give it clear space in every direction, at least an arm's length more than for an ordinary fire. Spruce crackles and throws sparks a long way. Check the wind before you light it, and put it out if the wind picks up. MCF reminds us that the wind can carry sparks into the forest. That applies even when there is snow on the ground.
Putting it out
This is the downside of the Swedish fire torch. The embers sit deep inside the wood, and a half-burnt log can glow for hours.
- Pour water straight down the middle and into the cuts.
- Tip the log over carefully with a spade, away from you, and knock it apart.
- Pour water again over all the pieces and on the ground where it stood.
- Rake around and feel with your hand above. No heat and no smoke should be left.
Have at least one bucket of water ready, ideally ten litres. Light it early enough for the torch to burn down before you need to leave, or choose a smaller log. Never leave a Swedish fire torch that's glowing, not even for a moment. More advice on putting fires out and on safe fire sites is in the guides to fire skills and tips and fire safety in nature.
The children's role
The Swedish fire torch is a good project to do together, as long as the children stay away from the sharp and heavy parts.
- Before, in the woodyard. The child chooses the log and draws the cross in chalk. A grown-up handles the chainsaw and axe, with the children well away, ideally indoors or with another grown-up.
- At lighting time. The child pushes birch bark and shavings down into the middle and lights it with a match or fire steel with a grown-up alongside. Slightly older children can carve the shavings themselves, with the same knife sense as in the guide to whittling a roasting stick and a tripod.
- Meanwhile. The child is the water guard and keeps an eye on the bucket. Mark a clear boundary around the torch, bigger than around an ordinary fireplace, because the log can fall.
- Afterwards. Once a grown-up has tipped the log over, the child pours water and feels with a hand above it that it's cold.
More ideas about roles and a safety zone are in cooking with children over an open fire.
If someone gets burnt
Cool a burn with cool water straight away, for about a quarter of an hour. 1177 (the Swedish healthcare advice service) says that longer than that increases the risk of hypothermia, and that ice and snow do more harm than good. Take off rings and watches near the burn, but don't pull off clothing that has stuck. Seek medical care if the burn is large or deep, or on the face, hands, feet or over a joint, and always if the child is one year old or younger. There's more in the guide to first aid while hiking.
The Swedish fire torch in winter
The Swedish fire torch is at its best when the ground is wet or covered in snow. Because it burns from the top, it doesn't melt its way down as fast as an ordinary fire, and it doesn't need a cleared fireplace. But it can still lean when the snow under it melts, so you need the plate here too. How fire works in the cold in general, and which dishes suit it, is covered in the guide to winter campfire food. If you're sleeping out as well, everything about that is in the guide to winter camping.
Log, cuts, base in brief
Next time the fire pit is under snow or the ground is too wet for an ordinary fire: bring a log from home. Choose one that's roughly knee-high and 25 to 40 centimetres thick, saw a cross that stops a hand's width from the bottom, and stand it on a fireproof plate. Light it in the middle from the top, lay two sticks across the top and put the coffee pot on them. And light it early enough for it to burn down before you head home.
What to bring for the Swedish fire torch
Frequently asked questions
How long does a Swedish fire torch burn?
It depends mostly on the thickness of the log and the type of wood. A narrow, dry spruce or pine log can be finished after a good hour, while a thick log of 35–40 centimetres burns for three to five hours. Hardwood such as birch burns more slowly than softwood. Also allow for the remains glowing long after the flames have died down.
How deep should you saw into a Swedish fire torch?
Saw the cuts straight down but stop about a hand's width from the bottom, so around ten centimetres. The unsawn foot holds the log together while it burns. If you saw too far down the pieces fall apart too early, and if you saw too short there's too little air at the bottom.
Can you make a Swedish fire torch in the forest?
Not from a tree that's standing there. Naturvårdsverket says you may not chop or saw down trees, and fallen trees belong to the landowner. Bring the log from home, buy it ready-made or ask the landowner. The fire itself follows the same rules as any other fire: a permanent fire pit or gravel and sand, and no fire ban.
Can you put a Swedish fire torch directly on the ground?
Only if the ground can take it, meaning gravel, sand or a permanent fire pit. The log gets hot right down to the foot towards the end and can lean or fall apart. Never stand it on bare rock, moss, peat or earthy forest ground. On snow and ice you need a fireproof plate underneath, otherwise it melts itself crooked.
How do you cook on a Swedish fire torch?
Wait until the fire is burning steadily in the middle and the top has started to flatten. Then lay two thin, split sticks or three small stones on top and put the saucepan or pan on them. You need the air gap, otherwise the pot smothers the fire. The Swedish fire torch is best for boiling water, heating soup and frying in a small pan.
How do you put out a Swedish fire torch?
Pour water straight down the middle and into the cuts, then carefully tip the log over with a spade and knock it apart. Pour water again, rake around and feel with your hand above it that no heat is left. The embers sit deep inside the wood, so it takes more water than an ordinary fire. So light it in good time before heading home, or choose a smaller log.
Can children make a Swedish fire torch?
Children shouldn't use a chainsaw or split wood with an axe, but they can do plenty of other things. They can choose the log, draw the cuts in chalk, stuff birch bark and shavings into the middle and be the one keeping an eye on the water bucket. When it's burning the same boundary applies as around any fire, and the log can fall, so the distance needs to be greater than for an ordinary fireplace.

