
Short answer
Fold a square of paper diagonally twice. Divide the small triangle's right angle into three 30-degree sectors and fold them on top of each other into a wedge. Cut the outer edge straight and make small notches from the sides without cutting away a whole fold. Unfold one layer at a time into a six-pointed snowflake.
What you need
- Thin paper, a square about 15–20 cm per side
- Scissors and a pencil
- A protractor for three equal sectors, optional
- Tape suited to the surface or thin string for hanging
Step by step
-
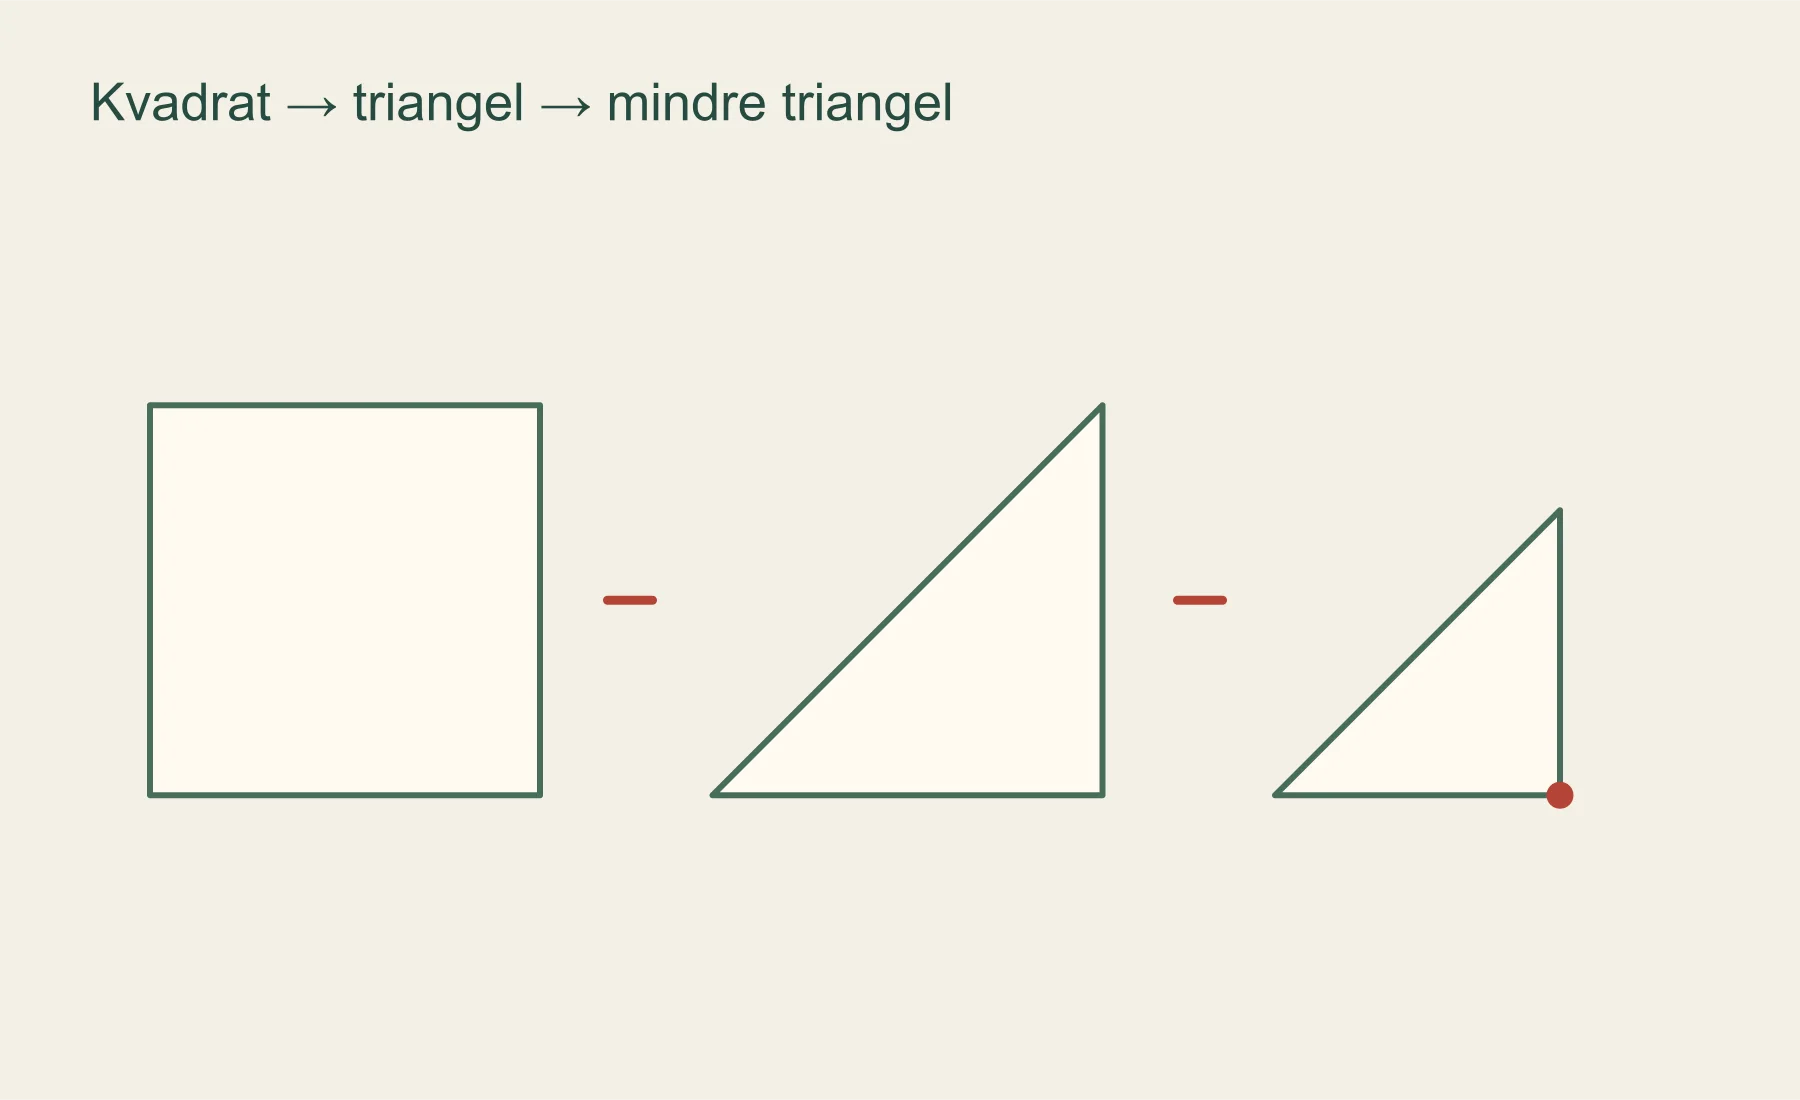
1. Fold a square diagonally into a triangle and then once more into a smaller triangle. Mark the right angle.
-
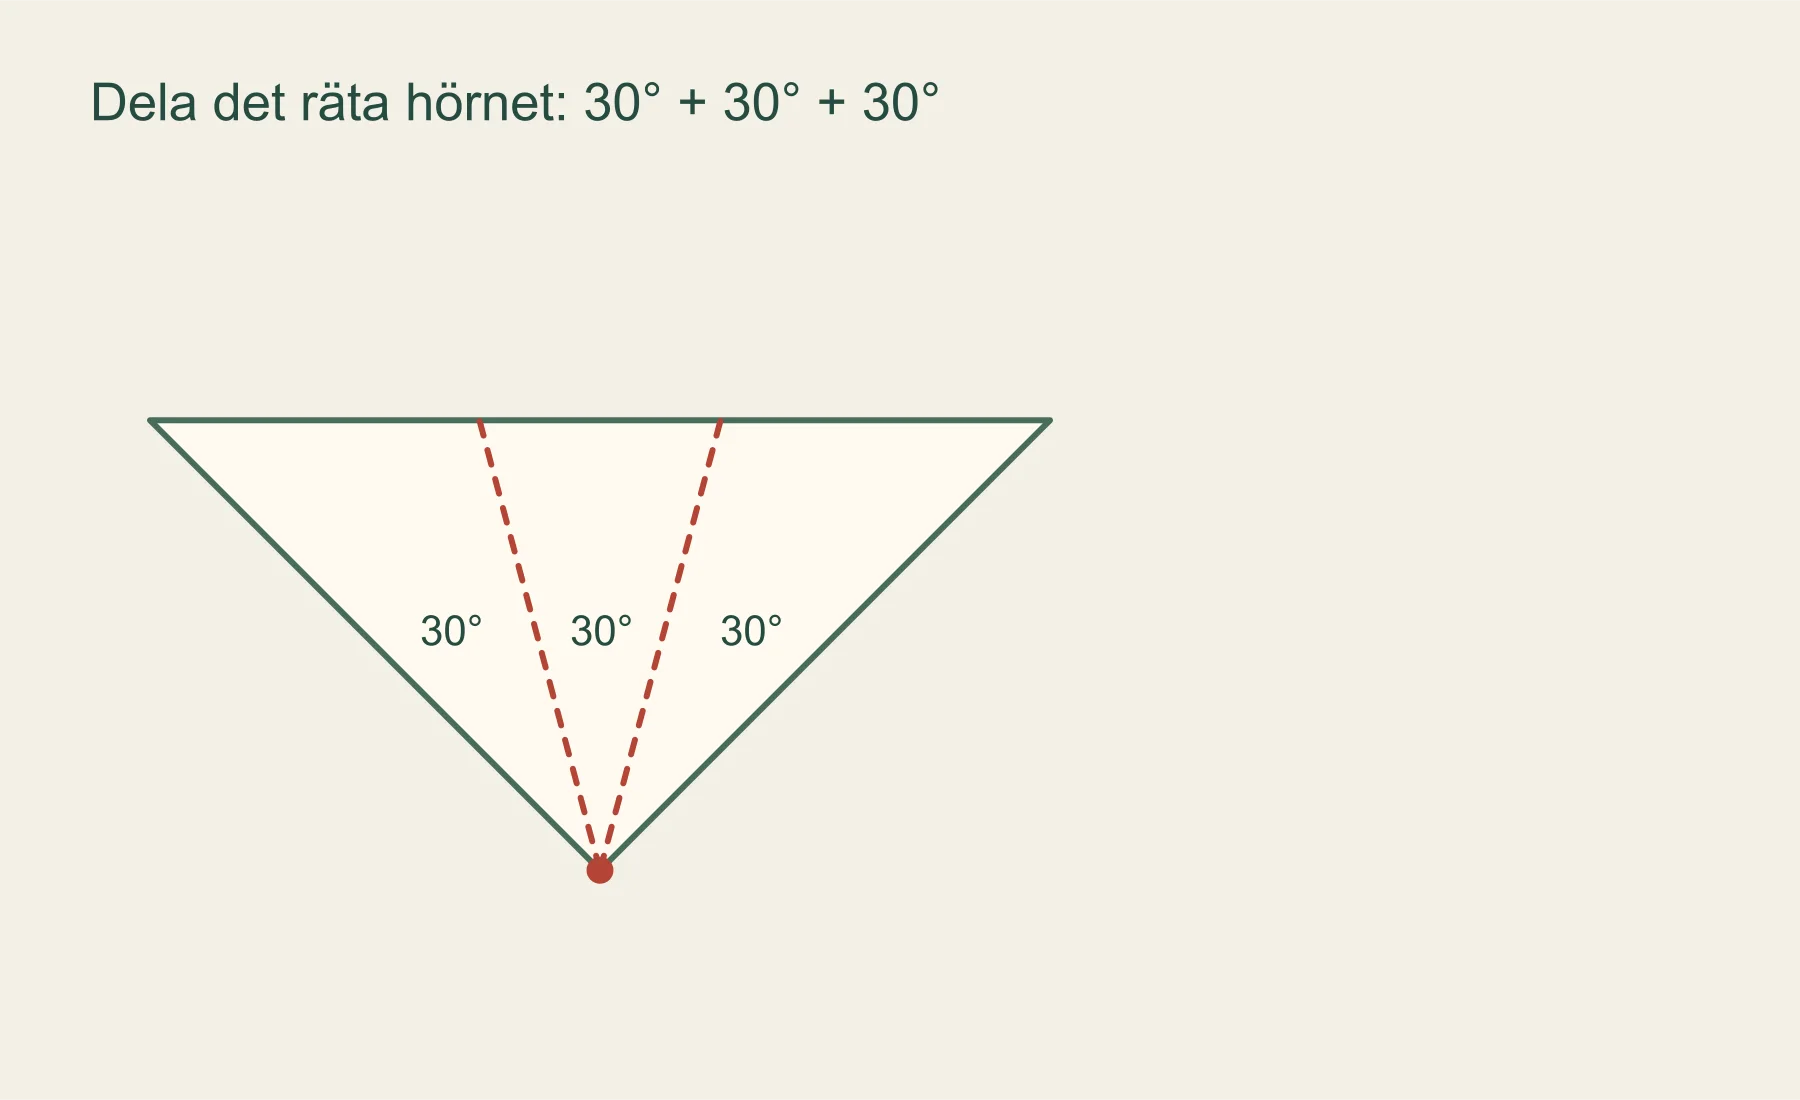
2. Divide the right angle into three 30-degree sectors. Fold the outer sectors over the middle into a narrow wedge.
-
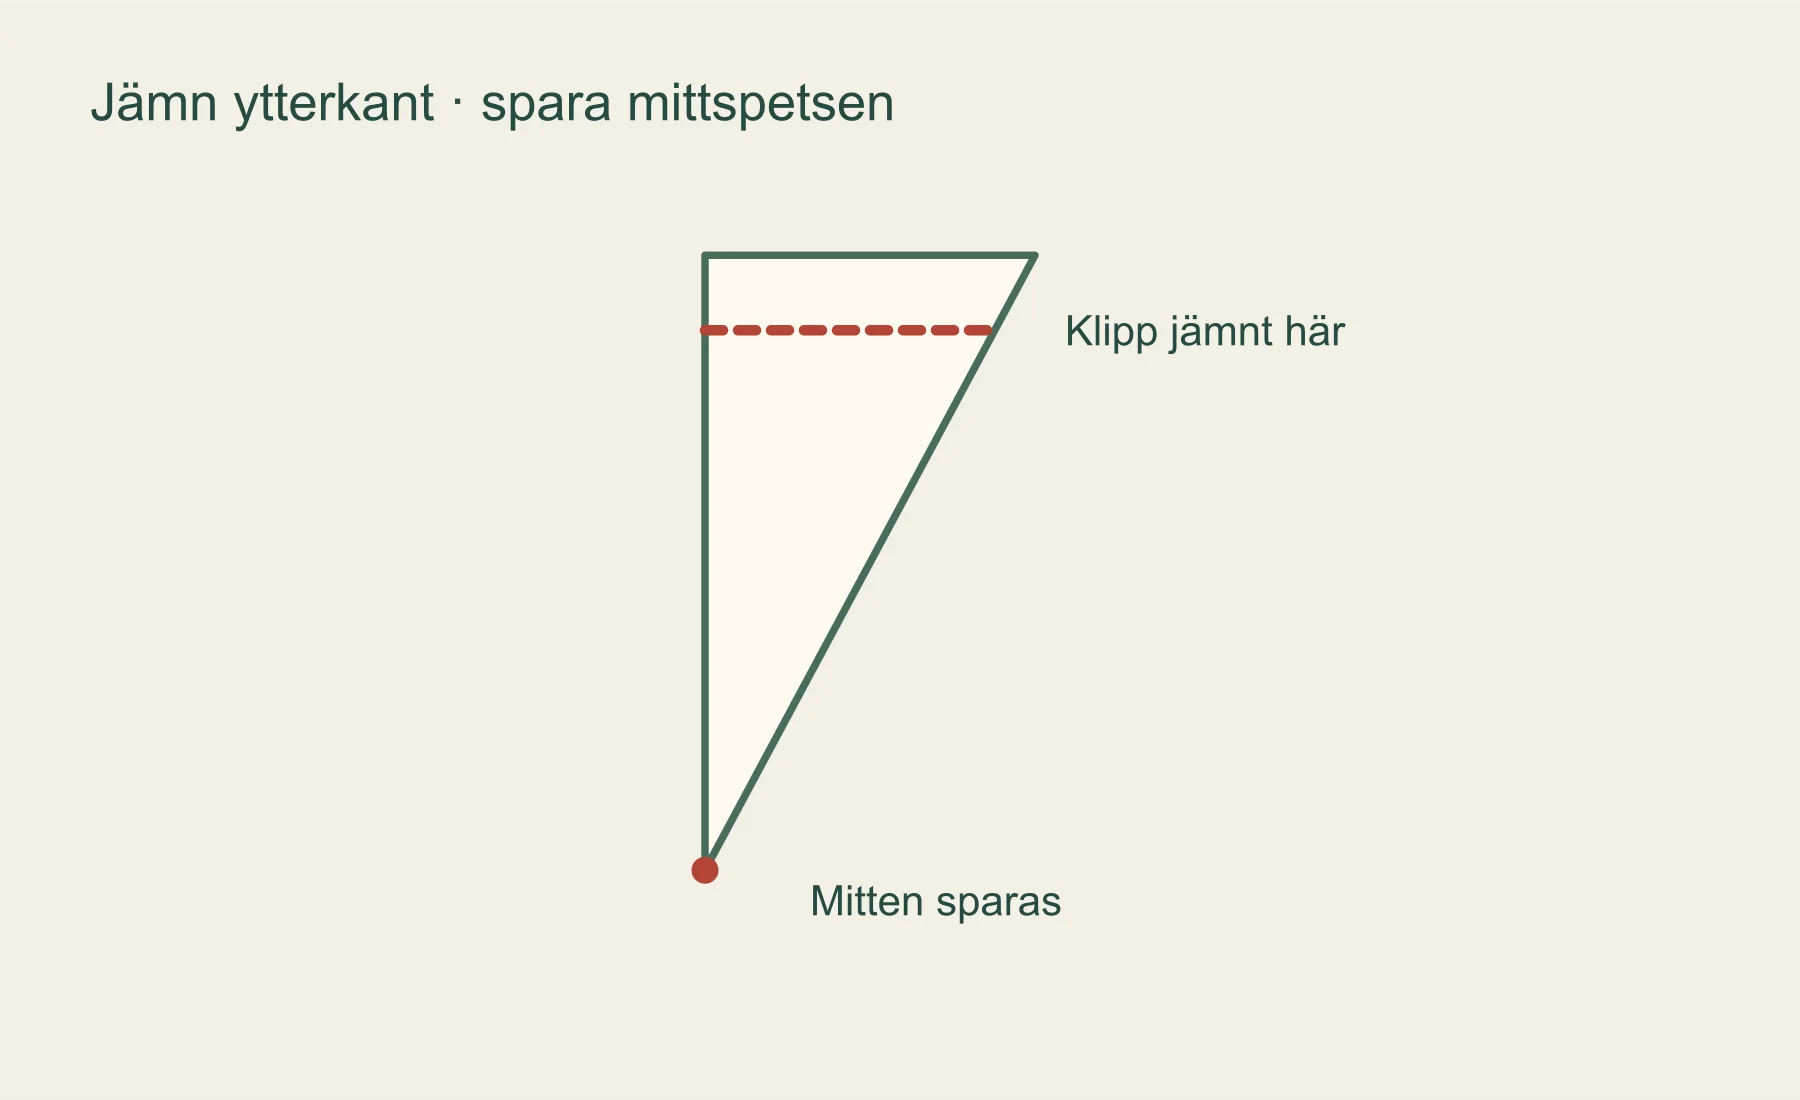
3. Cut the outer end straight where all the paper layers are. Keep the point, which becomes the centre of the snowflake.
-
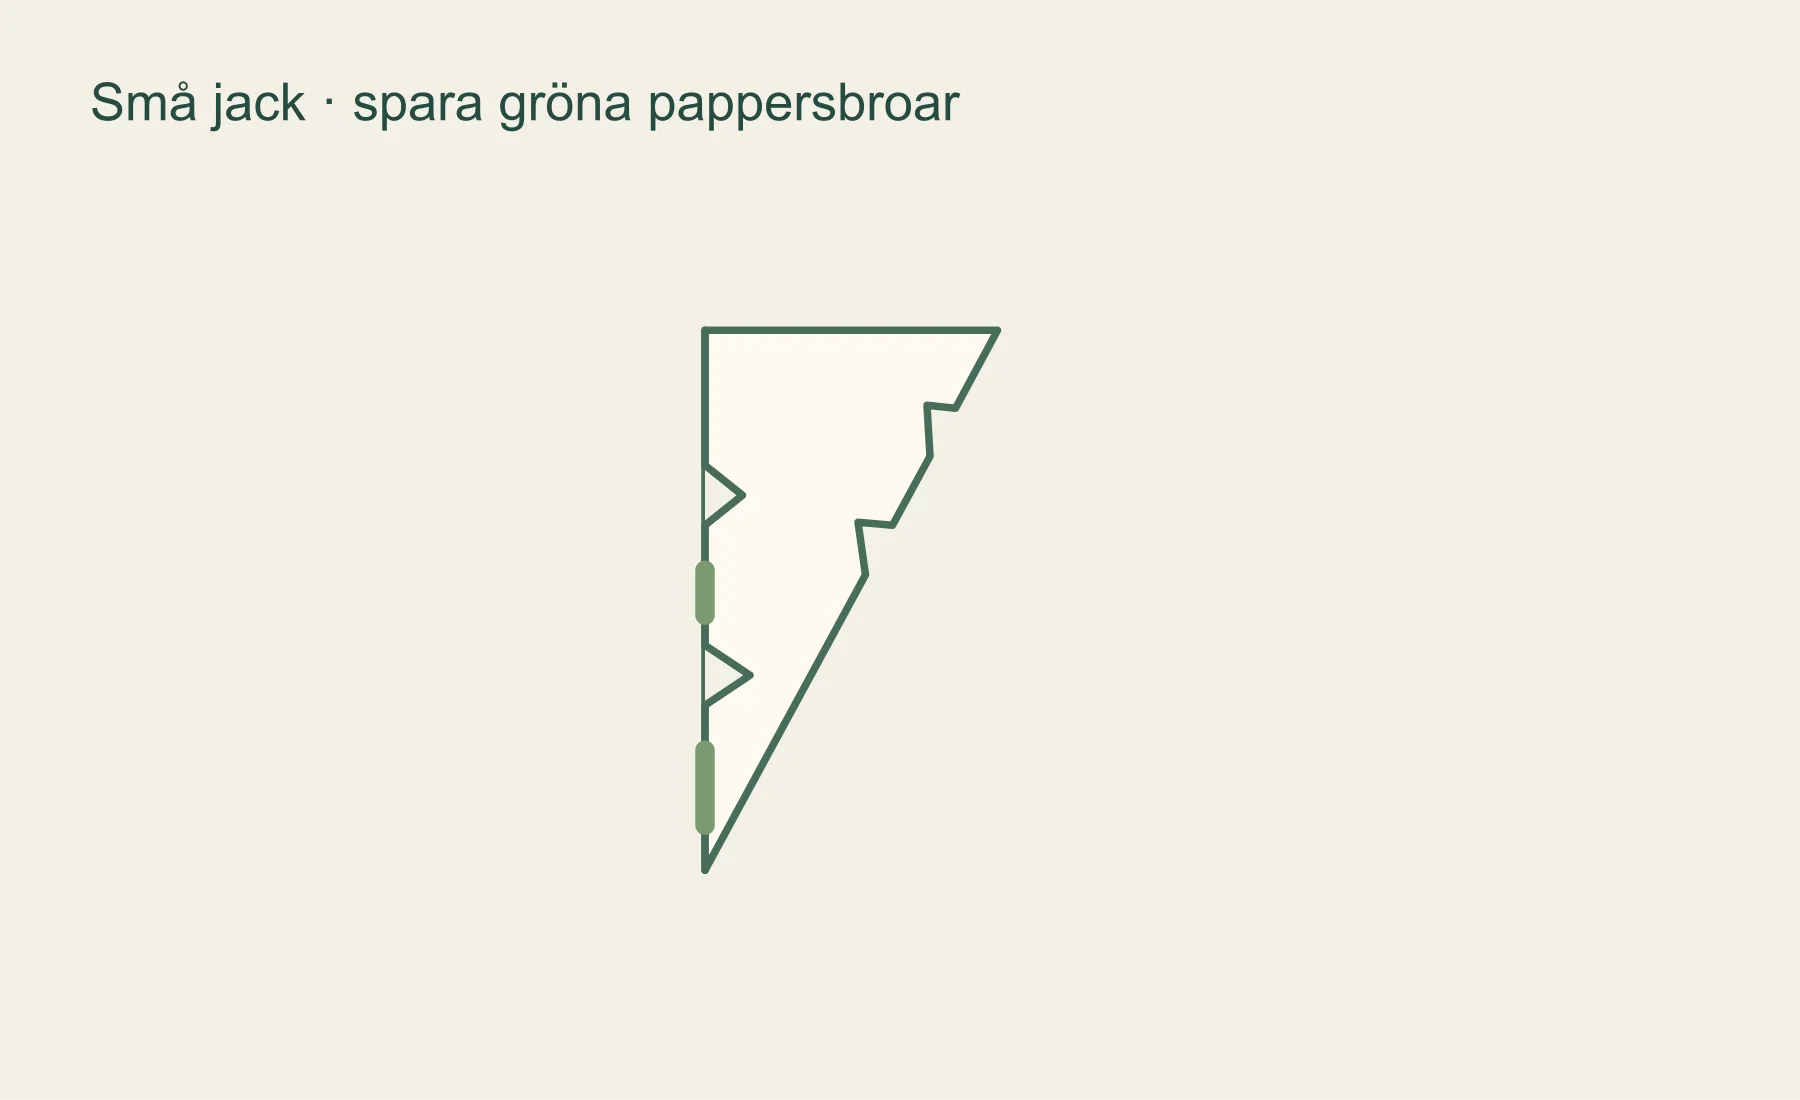
4. Cut a few small notches from the long sides. Leave paper connected between the notches and along parts of the folds.
-
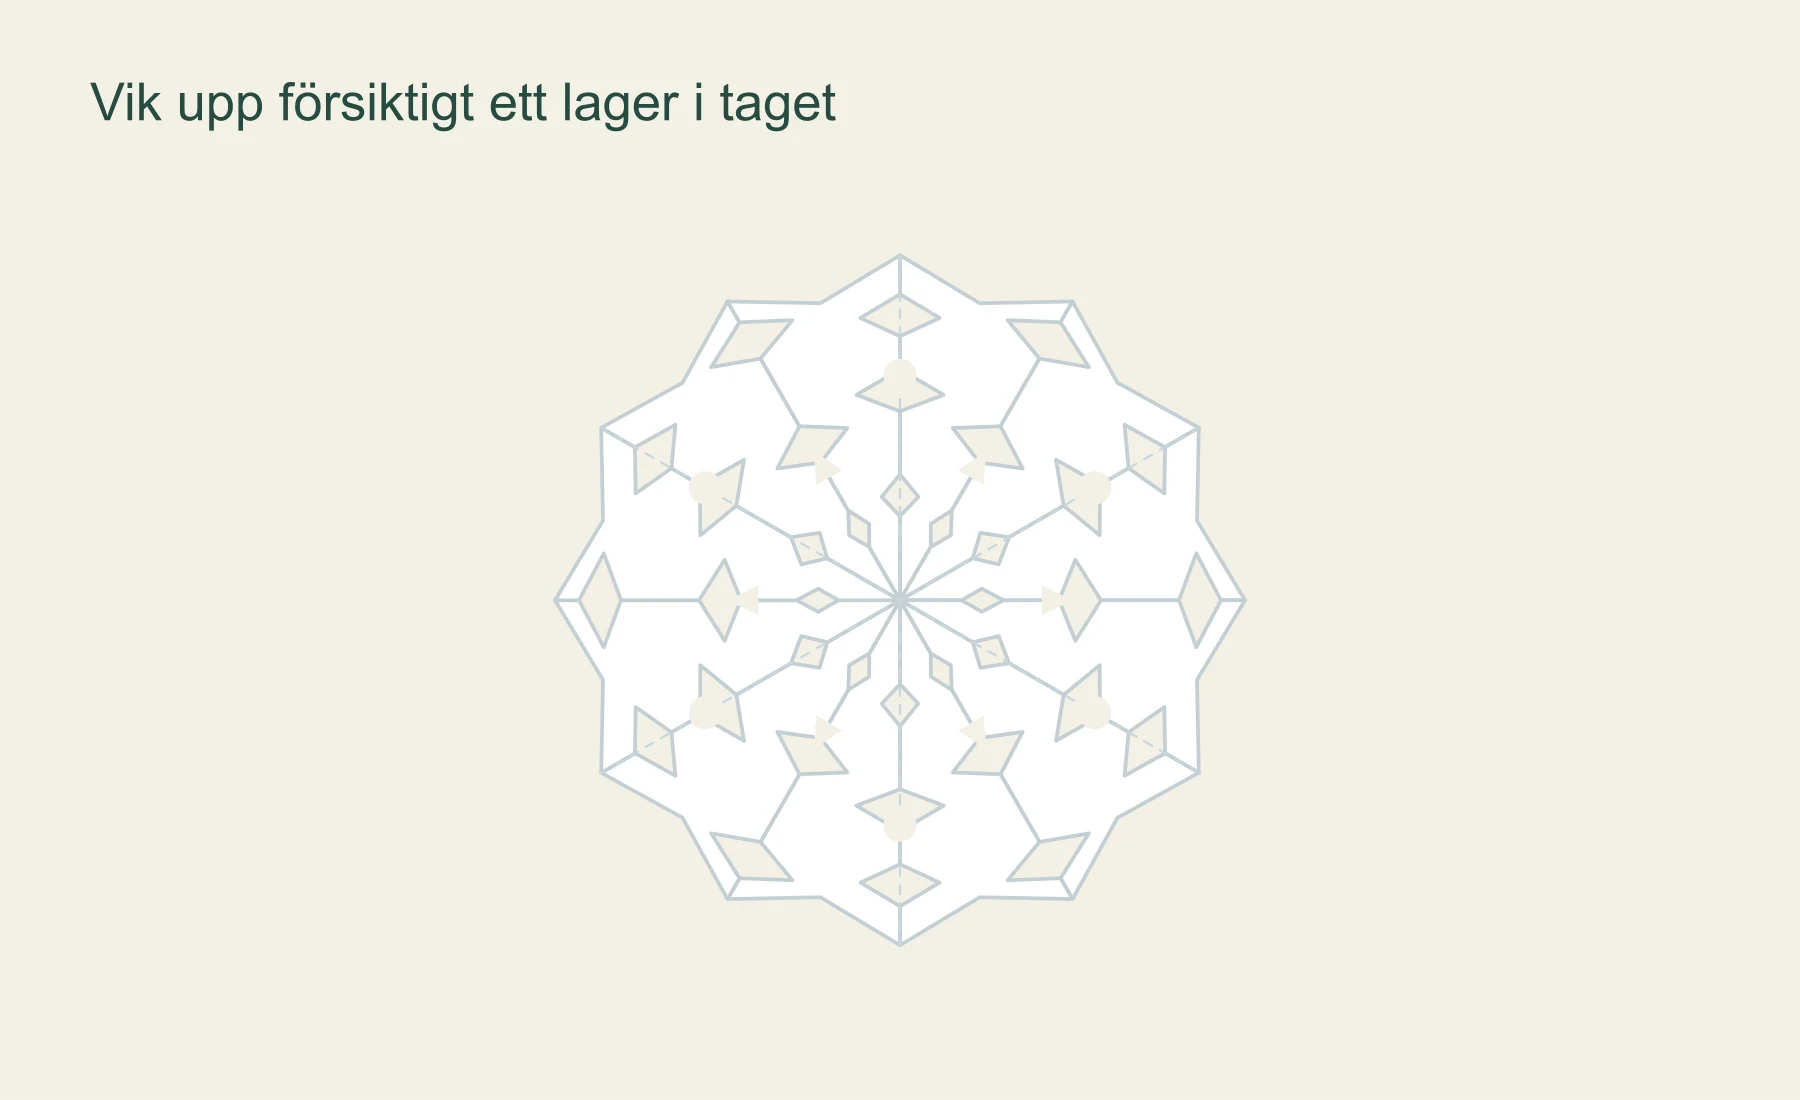
5. Carefully unfold one layer at a time and smooth it out with your hand. Attach the snowflake by a wide part.
A paper snowflake only needs a thin sheet of paper and a pair of scissors. The fun comes when the folded packet is opened and the little cuts become a pattern all the way round the snowflake. Make a simple one first; that makes it easier to understand where the next hole should go.
Finish folding before you start cutting, and leave bridges of paper between the holes. That way the snowflake holds together when it's opened. Here we make a six-part model, with three equal sectors in a folded corner. If you'd like to start with a simpler symmetry craft, there's our bat garland, where a single fold mirrors the shape.
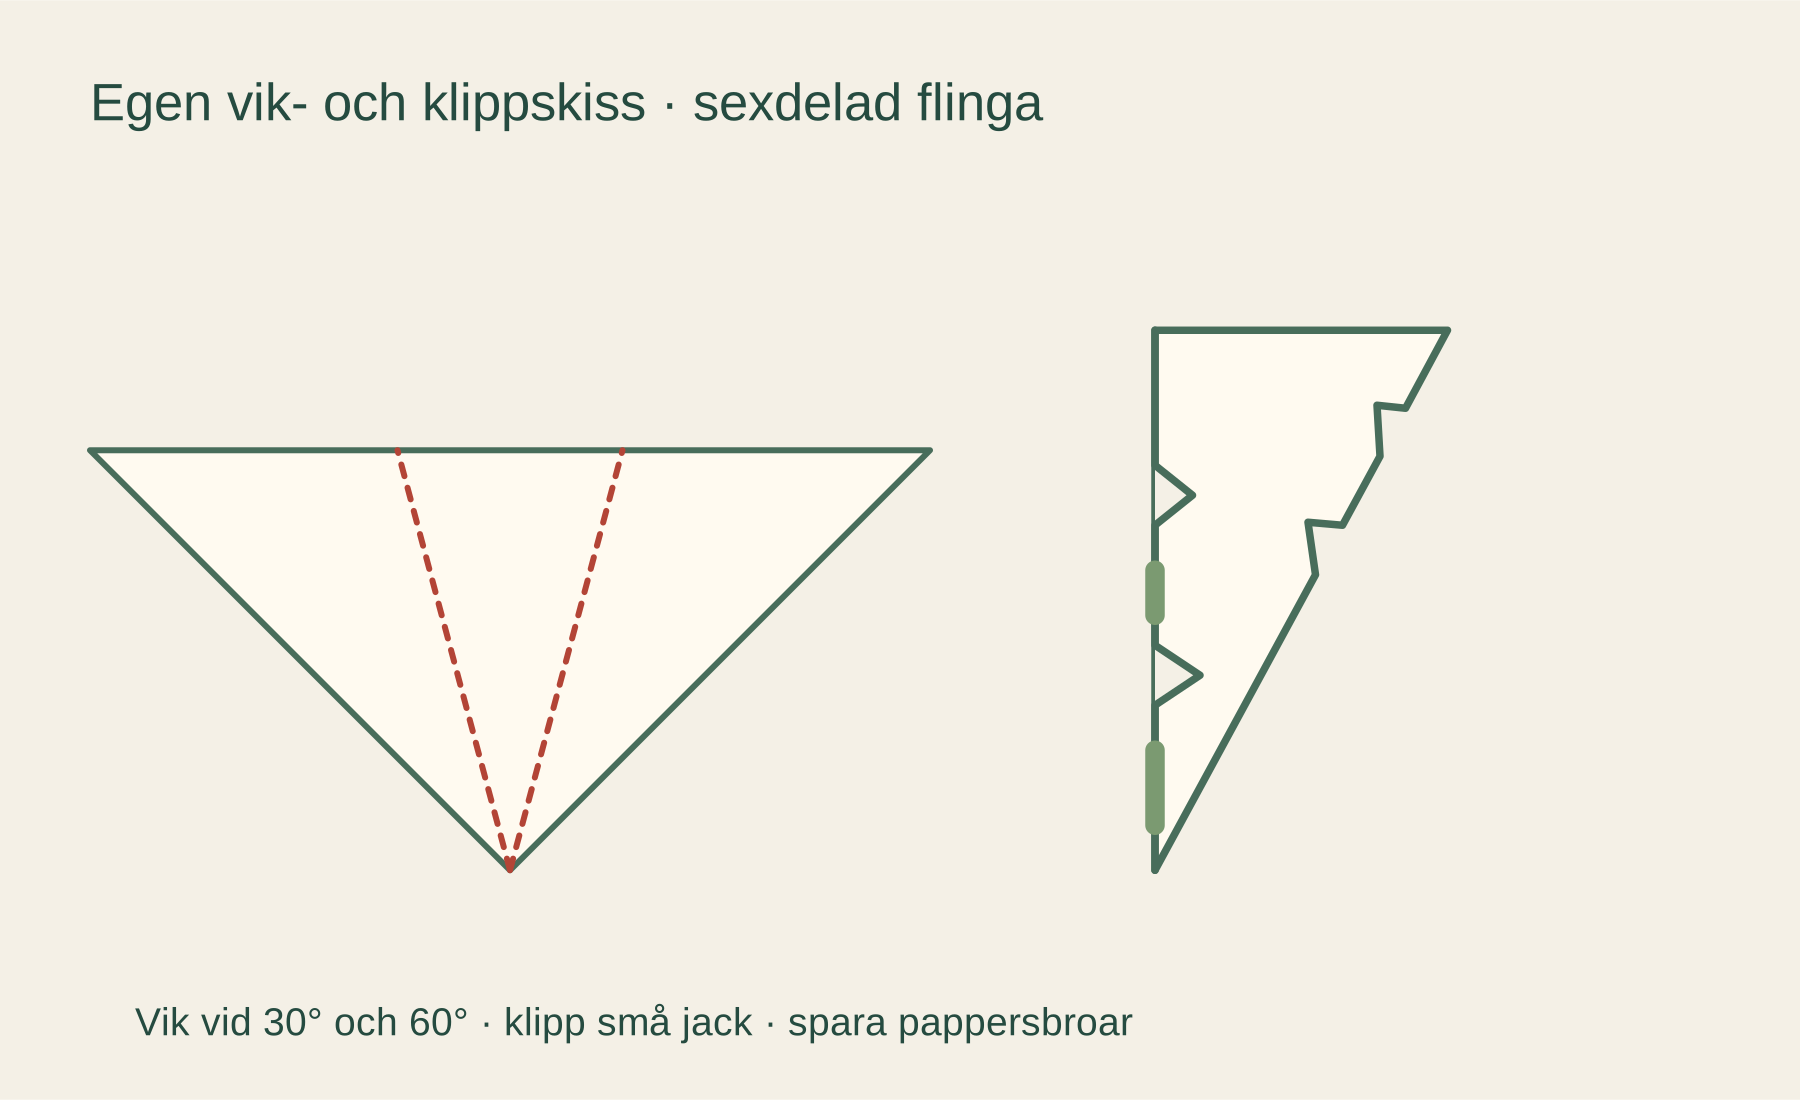
Open the folding and cutting sketch when you want the corners, fold lines and paper bridges in front of you. The sketch helps with the order; fold along the paper's own edges.
Start with thin paper and a square
Use ordinary thin printer paper or origami paper. Thick card is hard to cut through when lots of layers are stacked on top of each other. A square sheet about 15–20 cm per side is a manageable start.
If you have an A4 sheet, fold one corner down so the short side lines up edge to edge with the long side. Cut off the strip that sticks out and unfold – now you have a square. Save the strip for test cuts and small decorations.
Let an adult prepare squares and folded packets for anyone who would rather start with the scissors. Anyone who likes measuring can help with the corner that needs dividing into three instead. Not everyone has to go at the same pace.
Fold into a triangle and then a smaller triangle
Fold the square diagonally, corner to corner. Press the fold with your finger and lay the triangle on the table. Then fold it in half so the two points on the longest side meet. Now you have a smaller triangle with a right-angled corner.
It's the right angle, 90 degrees that needs dividing into three parts. Find it before you go on. If the corners get mixed up, the finished snowflake gets a different shape, even if the cutting itself is lovely.
Place the small triangle with the right angle towards you and the longest side furthest away. Mark the corner with a small dot that stays until you unfold. The dot shows where the centre of the snowflake will be.
Divide the corner into three equal sectors
Place a protractor with its centre on the dot and mark 30 and 60 degrees from the corner. Draw two faint fold lines from the dot out to the opposite side of the triangle. You've now divided the 90-degree corner into three equal parts.
Fold one outer sector over the middle, then the other over the first two. The edges from the corner should line up on top of each other so the packet becomes a narrow wedge. Press the folds and check that the corner with the dot is still neatly together.
Without a protractor you can fold loosely into three and adjust until the sectors are the same size. Only press the folds once the edges line up, and don't draw a cutting pattern before then.
Cut off the uneven flaps at the far end, straight across the wedge where all the layers are. Keep the pointed corner with the dot. That becomes the centre, while the straight outer edge becomes the snowflake's outline when it's opened.
Draw a few cuts and leave paper bridges
Start with two small notches along one long side and one along the other. Draw a small triangle or a rounded arc in from the edge. Leave several millimetres of paper between the holes and keep a connected part of each folded long edge.
Never cut away a whole folded side from the point to the outer edge. Then the pieces come apart. If you want a hole in the middle, the very tip of the point can be cut off, but save that for the next snowflake once you've seen how a whole centre works.
An adult helps where the paper packet has got thick and chooses scissors that suit the child's hands. Cut small pieces at a time and gather up the scraps straight away. Keep string and small bits of paper away from children who put things in their mouths, and hang paper decorations well away from flames and hot surfaces.
Open one layer at a time
Unfold the wedge slowly. If two layers are stuck together, ease them apart gently at the edge rather than pulling on a thin arm. Keep going until the whole snowflake lies open.
Lay it flat and press the folds with your hand. If you want to smooth it more, it can lie between clean sheets of paper under a book for a while. Keep glue and moisture away until you've seen that all the parts hold together.
Let the children compare the pattern with the cuts in the folded packet. The same little triangle has been repeated all the way round. A small drawing of the next wedge is a way to choose a new pattern without cutting at random first.
Choose a spot where the pattern shows
Attach the snowflake with small pieces of tape, or thread a loose loop around a wide part and let it hang freely. Never put tape or string on the thinnest arms. If the snowflake is going on a painted wall, test the tape somewhere out of sight first.
A row of white snowflakes in the window can be enough. For more colour beside them there's the orange garland, and for a different material you can build a star made of sticks. Make a snowflake as one of the activities in your advent calendar.
Why six sections?
The water molecules in an ice crystal tend to arrange themselves in hexagonal shapes, which is why a snow crystal almost always has six main arms. The paper snowflake mimics that: the folds make every cut repeat symmetrically when the packet is opened.
Next time you're outside, look for snowflakes on a dark mitten and compare them with the paper patterns. There's more to do on a short winter walk among child-friendly activities in nature. If the snow has become sticky, you can also build a snowman.
Frequently asked questions
Why does the snowflake fall apart?
Often a whole folded side has been cut away or the holes have got so big that no paper holds the parts together. Leave paper bridges and start with small notches.
Which paper is easiest to cut?
Thin paper, such as ordinary printer paper or origami paper. Thick card gets hard to cut when many layers are folded together.
How does the snowflake get six sections?
After two diagonal folds, the small triangle's right angle is divided into three 30-degree sectors that are folded on top of each other. That gives six-fold symmetry when the packet is opened.